
Bikepacking has revolutionized how cyclists explore remote terrain, combining the freedom of bicycle touring with the minimalist approach of backpacking. Unlike traditional touring with heavy panniers and rear racks, bikepacking equipment emphasizes lightweight gear that attaches directly to your bike's frame, enabling riders to tackle technical trails and rough roads that would be impossible with conventional setups. As more Indian cyclists discover the joy of multi-day rides through the Himalayas, Western Ghats, and rural countryside, understanding the right equipment becomes essential for both safety and enjoyment. This comprehensive guide explores everything you need to know about selecting, packing, and using bikepacking equipment for your next adventure.
Understanding Bikepacking Equipment Fundamentals
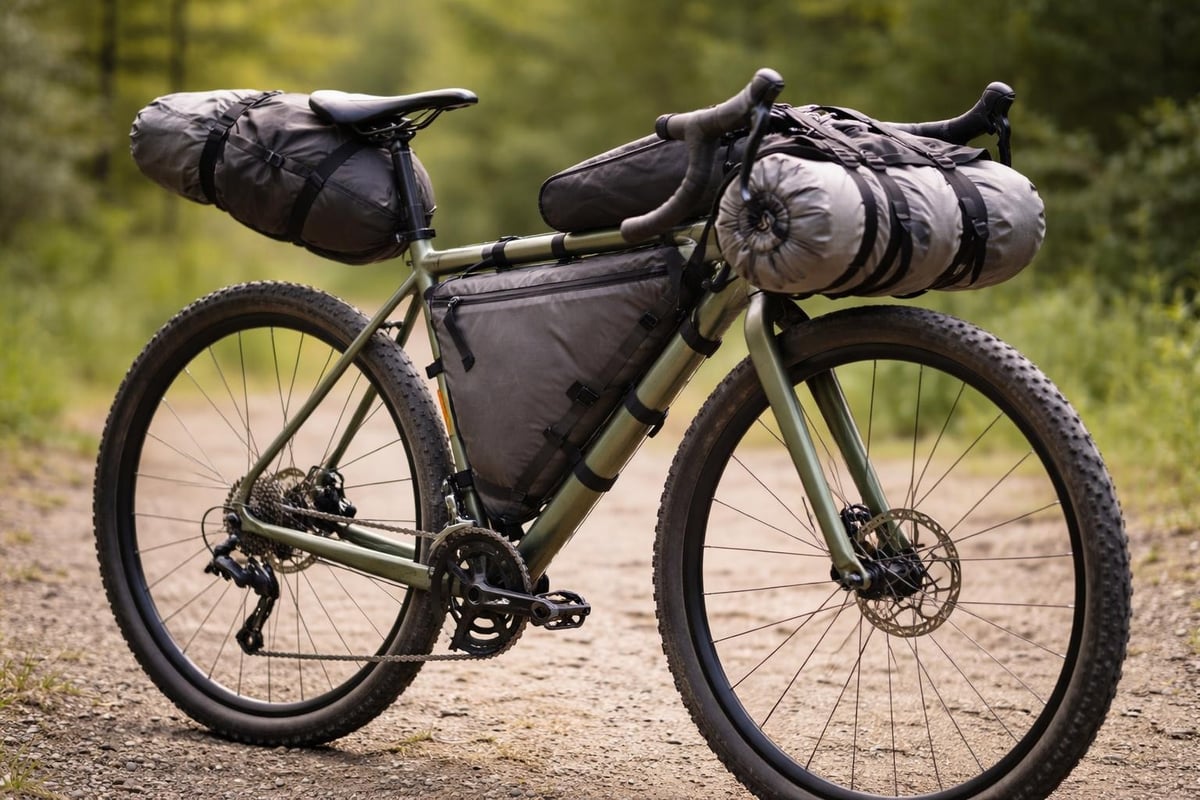
The foundation of any successful bikepacking setup begins with understanding how bikepacking equipment differs from traditional touring gear. While panniers hang from racks and create a wide profile, bikepacking bags attach directly to the frame, handlebars, and seat post, keeping the center of gravity low and maintaining bike handling characteristics. This approach allows cyclists to navigate singletrack, gravel roads, and technical descents without the pendulum effect of side-loaded panniers.
Modern bikepacking equipment has evolved significantly since the activity gained popularity in the early 2000s. Today's bags feature waterproof materials, lightweight construction, and mounting systems that work across various bike geometries. The Wikipedia overview of bikepacking provides historical context for how this discipline emerged from mountain biking culture.
The Core Bag System
Every bikepacking setup relies on three primary bags that form the foundation of your carrying capacity:
- Seat pack: Mounts beneath the saddle, typically 10-20 liters, carries sleeping bag and clothing
- Frame bag: Fits within the main triangle, holds tools, food, and heavy items for optimal weight distribution
- Handlebar bag or roll: Attaches to handlebars, usually 8-15 liters, ideal for tent, sleeping pad, or lightweight bulky items
Additional storage options include top tube bags for snacks and electronics, fork-mounted cages for extra water or gear, and downtube bags for tools or spare tubes. The key is balancing capacity with bike handling, as overloading any single point can negatively impact stability and control.
Essential Gear Categories for Multi-Day Adventures
Building a comprehensive bikepacking equipment list requires careful consideration of your route, duration, climate, and personal needs. Unlike car camping where you can bring everything, bikepacking demands ruthless prioritization. Each item must justify its weight and volume.
Sleeping System Components
Your sleeping system represents one of the heaviest and most critical components of your bikepacking equipment. Temperature ratings, pack size, and weight create a delicate balance that varies based on your destination and season.
| Component | Weight Range | Priority Level | Notes |
|---|---|---|---|
| Sleeping bag | 500-1200g | Essential | Choose temp rating 10°F below expected low |
| Sleeping pad | 300-600g | Essential | Insulated for warmth, thicker for comfort |
| Tent/shelter | 800-1800g | Essential | Consider bivy or tarp for ultralight approach |
| Pillow | 50-150g | Optional | Compressible or use stuff sack with clothes |
The detailed packing list from Bikepacking.com breaks down specific gear recommendations across all categories, helping you make informed decisions about sleeping systems and other equipment.
Clothing and Weather Protection
Layering systems work best for bikepacking because they adapt to changing conditions throughout the day. Unlike static camping, cycling generates significant body heat during climbs but requires insulation during descents and evenings. Your clothing selection should prioritize versatility and quick-drying materials.
Pack one extra set of riding clothes, minimal camp clothes, and weather-specific outer layers. Merino wool base layers excel for multi-day trips because they resist odor and regulate temperature effectively. Rain jackets with pit zips provide ventilation during active periods, while lightweight down or synthetic jackets offer warmth at camp.
For Indian cyclists exploring diverse terrain, the essential cycling accessories guide covers foundational gear that transitions well to bikepacking scenarios.
Navigation and Safety Equipment
Modern bikepacking equipment extends beyond bags and camping gear to include crucial navigation and safety items. While smartphones offer convenience, dedicated GPS units provide reliability in remote areas without cellular coverage. Battery management becomes critical on multi-day trips, making external power banks or dynamo hub systems valuable investments.
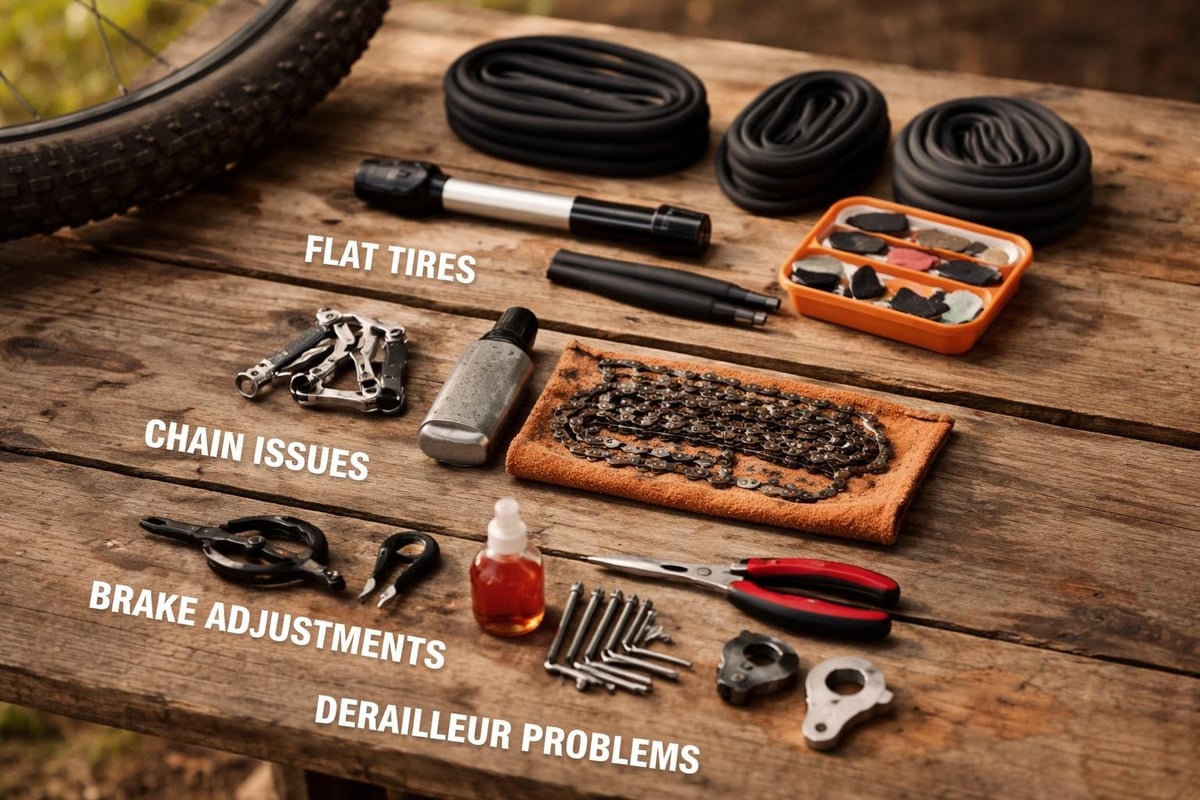
Emergency and Repair Essentials
Your repair kit should address the most common mechanical issues without carrying an entire workshop. Weight-conscious bikepackers focus on high-probability failures and multi-use tools.
Mandatory repair items:
- Multi-tool with chain breaker
- Spare tubes or tubeless repair kit
- Tire levers (preferably two)
- Patch kit as backup
- Master link for chain
- Small pump or CO2 inflators
Recommended additions:
- Spare derailleur hanger specific to your frame
- Duct tape wrapped around pump
- Zip ties in various sizes
- Spoke wrench
- Small bottle of chain lube
The comprehensive guide from Alastair Humphreys details real-world equipment choices from extensive bikepacking experience, including repair kit optimization.
Food, Water, and Kitchen Systems
Nutrition and hydration planning significantly impacts your bikepacking equipment choices. The balance between carrying capacity, water availability along your route, and cooking needs determines your setup complexity.
Water Storage Solutions
Frame-mounted bottles provide easy access while riding, but longer stretches between water sources require additional capacity. Soft flasks fit into frame bags or jersey pockets, while collapsible bottles pack efficiently when empty. Water filtration systems enable sourcing from streams, lakes, and questionable taps, dramatically extending your range.
For routes through populated areas, purchasing water and food reduces carrying weight. Remote wilderness sections demand self-sufficiency, potentially requiring 4-6 liters of capacity plus purification methods. Indian bikepacking routes through rural regions often pass villages where chai shops provide both hydration and cultural connection.
Cooking Equipment Options
Your cooking system represents a significant decision in bikepacking equipment selection. Options range from no-cook approaches using ready-to-eat foods to full kitchen setups with stoves and cookware.
No-cook advantages:
- Zero weight for stove and fuel
- Faster meal preparation
- No fire restrictions or fuel sourcing concerns
- Simplified packing and setup
Cooking system benefits:
- Hot meals improve morale in cold weather
- Wider food variety and better nutrition
- Coffee or tea in the morning
- Ability to purify water through boiling
Lightweight canister stoves weigh around 50-80 grams and pair with titanium or aluminum pots for minimal weight penalty. Alcohol stoves offer even lighter alternatives but slower cooking times. The beginner's guide from Trekology explores various cooking options suitable for different experience levels.
Bike-Specific Considerations and Modifications
Your bicycle itself becomes crucial bikepacking equipment requiring careful evaluation and potential modifications. While almost any bike can work for bikepacking, certain features enhance the experience significantly.
Frame Geometry and Mounting Points
Modern bikepacking bikes often include multiple bottle cage mounts on the fork, downtube, and under the downtube. These mounting points expand carrying capacity without additional bags. Older bikes may require creative solutions using rubber straps, Voile straps, or aftermarket mounting accessories.
Tire clearance determines terrain capability. Wider tires (40mm+) provide comfort and traction on gravel and dirt roads common in bikepacking routes. However, your frame and fork must accommodate these larger sizes. Road bikes can work for paved bikepacking routes, while mountain bikes excel on technical terrain.
When selecting equipment for your bikepacking setup, Cycling Gears Hub offers premium cycling gear and accessories designed for riders of all levels, including items that transition seamlessly from daily riding to multi-day adventures. Trusted by over 10,000 Indian cyclists, they provide quality products that improve comfort, safety, and performance across various riding disciplines.

Drivetrain and Gearing Optimization
Loaded bikepacking adds significant weight, making appropriate gearing essential for mountainous terrain. Lower gears enable climbing steep gradients without destroying your knees or morale. Many bikepackers switch to wider-range cassettes or even lower chainrings before major trips.
Groupset reliability matters more than weight savings when you're far from bike shops. The components and parts selection you choose should prioritize durability and serviceability over marginal weight differences.
Seasonal Equipment Adaptations
Bikepacking equipment requirements shift dramatically with seasons and climates. Summer trips through desert regions demand different gear than monsoon rides through Western Ghats or winter expeditions in northern mountains.
Hot Weather Modifications
Summer bikepacking reduces sleeping system weight but increases water and sun protection needs. Lighter sleeping bags or quilts suffice, and bivy sacks replace heavier tents. However, sun protection becomes paramount with lightweight clothing featuring UPF ratings, wide-brimmed hats or cycling caps, and quality sunglasses.
Water capacity increases significantly in hot, dry regions. Routes should be planned around reliable water sources, and carrying 4-6 liters between refills may be necessary. Electrolyte supplements help maintain performance and prevent heat-related issues.
Cold Weather Considerations
Winter bikepacking demands careful equipment selection to manage both riding and camping in freezing conditions. Sleeping bags rated for temperatures well below expected lows provide safety margins, while insulated sleeping pads prevent ground heat loss.
Clothing systems require more layers, creating packing challenges. Vapor barrier liners inside sleeping bags prevent moisture accumulation from condensation. Hand protection evolves from lightweight gloves to insulated pogies or heavy winter gloves depending on severity.
The detailed gear list from BikeTips includes seasonal variations and helps adapt your kit for different conditions.
Selecting Quality Bikepacking Equipment
Investment in quality bikepacking equipment pays dividends through reliability, longevity, and enhanced experience. However, budget constraints and the experimental nature of bikepacking mean strategic purchasing makes sense.
Prioritizing Equipment Investments
Not all bikepacking equipment deserves premium investment. Focus spending on items that directly impact safety, comfort, and reliability:
Priority investment areas:
- Sleeping bag appropriate for expected temperatures
- Quality frame bag with waterproof construction
- Reliable lighting system for navigation and visibility
- Comfortable saddle suitable for long days
Acceptable budget options:
- Handlebar bags from cottage manufacturers
- Basic tent or tarp shelter systems
- Generic seat packs from established brands
- DIY solutions for accessory storage
| Equipment Category | Budget Range | Mid-Range | Premium | Value Sweet Spot |
|---|---|---|---|---|
| Bag set (3 bags) | ₹8,000-12,000 | ₹15,000-25,000 | ₹30,000+ | Mid-range |
| Sleeping bag | ₹5,000-8,000 | ₹12,000-20,000 | ₹25,000+ | Mid-range |
| Tent/Shelter | ₹6,000-10,000 | ₹15,000-25,000 | ₹35,000+ | Budget-Mid |
| Sleeping pad | ₹3,000-5,000 | ₹7,000-12,000 | ₹15,000+ | Mid-range |
Testing Before Committing
Before investing heavily, test bikepacking equipment through overnight trips close to home. This approach reveals fit issues, packing inefficiencies, and personal preferences without the pressure of remote expeditions. Borrowed gear, rental options, or budget alternatives help determine what features matter most to your riding style.
The insights from 4XPEDITION provide real-world testing perspectives that inform smarter purchasing decisions.
Packing Strategies and Weight Distribution
Owning appropriate bikepacking equipment represents only half the challenge. Packing efficiently and distributing weight properly transforms a miserable experience into an enjoyable adventure. Poor weight distribution creates handling problems, while inefficient packing leads to frustration searching for items.
Strategic Item Placement
Frame bag principles:
- Heavy items low and centered (food, tools, water)
- Frequently accessed items near top (snacks, phone, wallet)
- Irregular shapes that won't fit elsewhere
- Keep weight between wheels for stability
Seat pack guidelines:
- Lightweight, compressible items (sleeping bag, puffy jacket, extra clothes)
- Items needed only at camp
- Keep weight minimal to prevent sway
- Pack tightly to avoid sagging
Handlebar bag/roll approach:
- Bulky, lightweight camping items (tent, sleeping pad)
- Balance with seat pack weight
- Secure firmly to prevent handlebar rotation
- Consider aerodynamics on road sections
The comprehensive packing strategies from Wilderland Media detail how professional bikepackers organize gear for maximum efficiency.
Minimalist Packing Philosophy
Experienced bikepackers embrace minimalism not just for weight savings but for simplified decision-making and reduced stress. The "rule of threes" helps evaluate each item: if it doesn't serve three purposes or isn't essential for safety, survival, or comfort, reconsider its inclusion.
Multipurpose item examples:
- Buff or bandana: sun protection, sweat management, water filtration pre-filter, pot holder
- Trekking poles: shelter support, creek crossing aid, tent stakes, photography monopod
- Rain jacket: weather protection, wind layer, extra warmth, ground cloth
- Smartphone: navigation, camera, communication, entertainment, emergency beacon
Specialized Equipment for Indian Conditions
Bikepacking across India presents unique challenges requiring specific equipment considerations. Monsoon seasons, intense heat, diverse terrain, and varying infrastructure demand adaptive approaches to standard bikepacking equipment.
Monsoon-Ready Modifications
Waterproofing becomes critical during monsoon months. Dry bags inside your bikepacking bags provide redundant protection for electronics, sleeping systems, and clothing. Completely waterproof handlebar and seat bags cost more but eliminate anxiety during sustained rain.
Fenders prevent road spray from soaking you and your gear, though they add weight and complexity. Minimalist clip-on versions offer compromise solutions. Quick-drying clothing and synthetic sleeping bags resist moisture better than down in humid conditions.
Infrastructure Adaptations
Indian road conditions vary from pristine highways to potholed village lanes. Durable tires with puncture protection save frustration and carry extra tubes beyond typical recommendations. The availability of bike shops varies regionally, making comprehensive repair kits and mechanical knowledge essential.
Navigation equipment should include offline maps downloaded before departure, as cellular coverage remains inconsistent in remote areas. Paper maps provide reliable backup for regions without digital coverage. The top cycling accessories overview highlights items particularly valuable for Indian cycling conditions.
Cultural Considerations
Modest clothing respects local customs in conservative rural areas. Long pants or convertible pants offer versatility, while shirts with sleeves prevent both sunburn and cultural friction. Carrying small denominations facilitates purchases in villages without banking infrastructure.
Language barriers make visual communication tools helpful. Translation apps work when connectivity exists, but basic phrase learning shows respect and builds connections. Tea shops and dhabas provide opportunities for interaction, hydration, and local knowledge about road conditions ahead.
Maintenance and Care of Bikepacking Equipment
Quality bikepacking equipment requires proper maintenance to ensure longevity and reliability. Field repairs address immediate issues, while post-trip care preserves your investment for future adventures.
On-Trail Equipment Care
Daily maintenance prevents small issues from becoming trip-ending problems. Wipe down bags to remove mud and debris, check mounting straps for wear, and redistribute weight if handling feels compromised. Inspect tent seams and zippers for damage, applying seam sealer if minor leaks develop.
Daily bike maintenance checklist:
- Check tire pressure and inspect for cuts or embedded debris
- Verify brake function and pad wear
- Test shifting across full gear range
- Examine chain for dirt buildup, lube if dry
- Tighten any loose bolts or mounting hardware
- Clean drivetrain if excessively dirty
Post-Trip Equipment Protocol
Thorough cleaning after trips prevents long-term damage from dirt, moisture, and UV exposure. Empty all bags completely, washing fabric with mild soap and water. Dry thoroughly before storage to prevent mold and mildew. Inspect seams, zippers, and mounting points for wear or damage requiring repair.
Sleeping bags and pads should air out completely before compression storage. Store sleeping bags loosely in large cotton or mesh bags rather than compressed stuff sacks. Tent fabric benefits from UV protectant sprays, while poles and stakes need inspection for bends or breaks.
Building Your First Bikepacking Kit
Starting bikepacking doesn't require purchasing every item simultaneously. Strategic acquisition spreads costs while building experience that informs future purchases. Begin with overnight trips using borrowed or improvised equipment, then invest based on identified needs.
Starter Equipment Approach
Phase 1 (First overnight trip):
- Use existing camping gear strapped to bike
- Borrow bags from friends if possible
- Focus on route selection near home
- Test basic systems and identify challenges
Phase 2 (Equipment foundation):
- Invest in quality frame bag
- Purchase appropriate sleeping bag
- Acquire basic seat pack or handlebar roll
- Expand repair kit for self-sufficiency
Phase 3 (System refinement):
- Upgrade remaining bags based on experience
- Optimize clothing and kitchen systems
- Add convenience items (comfortable pillow, better lighting)
- Explore longer, more remote routes
Learning from Experience
Every trip reveals equipment strengths and weaknesses. Keep notes about what worked, what didn't, and what you wished you had brought. Share experiences with other bikepackers through online communities, local cycling groups, or social media to accelerate learning.
Experiment with different packing strategies, route types, and seasonal conditions. Your ideal bikepacking equipment setup evolves as your experience, fitness, and preferences develop. What works for someone else may not suit your riding style or priorities.
Selecting and using appropriate bikepacking equipment transforms multi-day cycling adventures from survival ordeals into memorable experiences connecting you with landscapes, cultures, and personal capabilities. By understanding the fundamentals of bag systems, prioritizing essential gear, and adapting to specific conditions, you'll build confidence for increasingly ambitious trips. Whether you're exploring Himalayan valleys, coastal routes, or rural backroads, the right equipment enables you to focus on the journey rather than gear struggles. Cycling Gears Hub provides the quality cycling products and accessories Indian riders need to transition from daily commuting to bikepacking adventures, backed by fast shipping, flexible payment options, and hassle-free returns that make gear acquisition simple and stress-free.